Showing posts with label Spazzy Crafter. Show all posts

Friday, March 31, 2023

Life and What Drives Me by Spazzy Crafter

Two knit baby hats are on a transparent table. One is a blush pink and the other is blue with hints of purple.

I was born early one morning in late July in the southern part of Wisconsin. Mirroring my normal enthusiasm for life, I arrived twelve weeks too soon at two pounds and twelve ounces. The doctors didn’t give me a good prognosis; if I survived, I wouldn’t be able to chew gum or even swallow.

I spent the first month in the NICU. One of my parents stayed while the other was home with my older siblings. When I was finally released from the hospital, I weighed just barely over two pounds more than my starting weight. I wore Cabbage Patch doll clothes for the first six weeks of my life.

This year, I enter the period of life people affectionately call the “late thirties”. I survived beyond all obstacles.
~*~
I began loom knitting two years ago and had an idea: I'd donate preemie hats to local hospitals. It's my way of giving back and has helped me find a sense of purpose. It’s a way to keep the little ones warmer and more comfortable while surrounded by the bright lights and invasive tubes.

I have a whole bag of momentos from those early days, though I obviously can’t remember them. Someday, I hope my hats end up in other people’s bags and boxes of memories, and that they can hold them in their hands decades later.

Friday, September 30, 2022

Overview: Stamped Cross-Stitch by Spazzy Crafter

Two images: the one on the left is on white with a khaki pattern of two dogs in an autumn basket with leaves. The picture on the right side is of the design fully finished, complete with texture on the chocolate labs.

Everything that comes in a stamped cross-stitch kit:

Embroidery floss

Printed instructions

Needle

Fabric (with the design)

Colored picture of the completed design

The basics and tips:

The easiest way to begin your project is to start from the middle and work your way out. The instructions tell you how many strands of each color you need for each part of the project. Basically, you embroider a bunch of small X’s on the fabric. The most efficient way to not lose your place on your project is to mark off on your instructions. You have to be careful not to get the fabric wet or dirty because it will fade the design. However, dampening your floss a bit on the end helps with threading the needle.

On embroidery hoops:

Depending on the size of the project, you might want an embroidery hoop. Hoops make it easier by allowing you to focus on small areas at a time. I also use them because they are better to hold onto than trying to work with everything laid out. Embroidery hoops don't always come with the kit, but you can find them at crafting stores or Amazon.

To use the embroidery hoop, unscrew the top of the hoop. Put the smaller hoop on the underneath side of the project. Then, put the bigger part of the hoop over the front. Snap the smaller and bigger parts together and tighten the top.

As a disabled crafter:

I need help with inserting the embroidery floss in the eye of the needle and separating the floss strands. My hands just don’t cooperate enough.

Friday, February 25, 2022

Sentro Knitting Machine by Spazzy Crafter

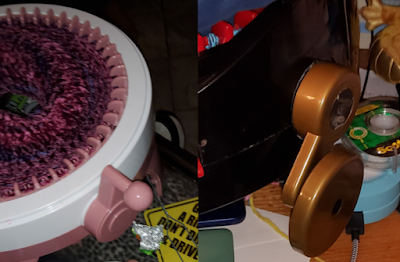
Image: The Sentro machine is on the left with a purple project in its center. The small, pink handle/crank has a ball on the end. The right side has the Addi machine with its handle prominent; it's larger with a thick, flat circle on the end to grab.

If you're looking for a less expensive loom knitting machine, you might want to try Sentro brand knitting machine. The Sentro comes in three different sizes: 22 needles, 40 needles, and 48 needles. The 22 needles size costs around 40 dollars on Amazon, the 40 needles one costs around 50 dollars, and the 48 needles costs about 70 dollars.

Things I like about the Sentro are:

The price

The included tensioner you put on the machine (makes one-handed knitting easier)

Handle shape is smaller and easier for me to grasp

Suction cups on the legs (I can’t use a clamp on my tray, so they help the machine remain stationary)
~*~
The one thing I don't like about the Sentro is how, if you accidentally hit the reset button on the row counter, there is no way for you to go back.

P. S. The reason I started looking into the Sentro is because shortly after I bought my Addi the handle broke. The handle for the Addi set me back about 30 dollars, and it shipped from Germany. Also, a tensioner for my Addi costs eight dollars… I’m already on my second one.

Friday, October 29, 2021

Using the Addi Express (Two Sizes) by Spazzy Crafter

Image: A round, black, plastic machine with red pegs (except for two white near the shuttle). There are a few rows of blue yarn on the pegs, and the yarn ball sits a few inches away. The background is a tile floor.
If you like to loom knit and are looking for a way to do it more independently, then the Addi Express (with 22 needles) and the Addi Express King Size (with 46 needles) are for you. They are a series of hand-crank knitting machines from Germany.
We should now talk about the price. The Addi Express and the Addi Express King Size price varies depending on where you get them and if you want them as a bundle. They can run anywhere between $170 to $430 USD.

Yarns that work:

It takes a lot of trial and error, but medium weight yarns are generally recommended. Since the machine is made in Germany, DK (double-knit yarn) might be the best; the US equivalents are gauges seven, eight, and nine. If you use thicker/thinner yarn, the machines will drop stitches. Performance can also vary between yarn brands and amount of tension.

What comes with:

Extra needles in case they break, one tapestry needle (per machine), stoppers (these are included with some machines), instructions, and the machines themselves. There is a row counter on the machine.

Using the Addi:

Cast on the yarn by starting at the first black peg on the right. All the pegs have a hooked top. Put the yarn in the hooked part, then put the yarn behind the next peg, and continue alternating going in front and behind the pegs until you make it all the way around the loom. Place the yarn strand in the shuttle and close the little door. Rotate the handle to cast on all the pegs and keep rotating until you get the desired number of rows. The tapestry needle is used to collect the stitches from the pegs when you’re ready to finish the project.

Pros and cons of the Addi Express:

The major pro for me to the Addi Express is that I only need help with the casting on and the binding off. It takes about a half hour to make a hat. It can also make panels for things like baby blankets; there is a switch for round or panel knitting.

The major con is the price. It can drop stitches because it doesn't come with a tensioner.

Extras for separate purchase:

A tensioner makes one-handed use easier
Suction cups for the legs (I haven’t tried them yet)
Clip weights might also help with dropping stitches
Image: The left side has a smaller machine with white yarn cast on and a ball of yarn nearby. The background is a quilt of varied colors with rounded shapes separated by small, checked squares. The right side of the image is the finished product... a white hat.
There are cheaper knitting machines out there (like the Sentro), but I haven’t tried them. Some come with a tensioner built in. 

Friday, July 30, 2021

Diamond Painting Overview by Spazzy Crafter

The best way for me to explain diamond painting is it reminds me a lot of paint by numbers. The differences are that the project is sticky, and (instead of using paint) you use drills also known as dotz. The drills come in either square or round. 

Image: A portrait of a Yorkie comprised of little colored squares. You can see a reference key along the bottom.

Below is a list of what comes in a diamond painting kit:

Canvas (or other material) that has a pre-printed picture on it with adhesive. On the canvas kits, there is a number and letter key. Card kits come with separate instructions.

Diamond painting pen

Small tray

Small bags with corresponding numbers to the key or instructions

Wax square

Tweezers (in most larger kits)

Image: A red square of wax sits on paper that reads "Sunnor Group". On the right side, a pink pen is pressed into the wax.  A person's finger is also visible.  
How-to:

The adhesive canvas has either paper or clear plastic on it. So, to start, peel the little piece of plastic off the wax. Take the diamond painting pen and dip the tip of it into the wax until the tip is full. Peel the corner of the canvas back until you see a number or a letter, then use the key on the side of the canvas to match the number on the bags. Open the bag with the corresponding number you want to start with, and put the drills in the tray. Use the diamond pen to pick up the drills by the shiny side; the flat side goes on the adhesive canvas. You do that until the project is complete. 

For me, the round drills are easier to use because you don't have to be as exact when sticking them on the canvas. The square drills, in my opinion, make a nicer-looking project.

Here are some accessories that might help:

Portable headlamp with magnification glasses for if you have trouble seeing the little diamond drills. 

I have never used it, but there is something called a diamond painting ruler. It is supposed to help you keep your diamond drills lined up. 

Does anyone else know of anything that will help make diamond painting easier? 

~*~

Additional Notes: 
If you have spasms, it helps to only put a few drills into the tray at one time in case you spill.
There are little storage containers for the drills that are similar to those for beads.
Gently shake the ridged tray to turn the drills face up, so you don't have to do it with your fingers.
Most drill colors have universal numbers so you can order more if you need.

Friday, November 27, 2020

Card Making with Spazzy Crafter

Today, I will be talking about some of the different types of cards I have made. Also, some of the supplies I find that work (for me) the best.

Card kits

I like these because most of the supplies that you need are included... even an unfinished card. Most of them come with double-sided sticky squares (one side sticks to the card, and the other side sticks to the embellishment). Sometimes, there are embellishments that have a sticky back to them so you just peel off the paper. One of the best things about these kits is that they come with instructions so you can see an approximation of what the card will look like when it’s done, but you don’t always have to follow exactly. It’s your choice, so it becomes your design.

Now, one thing I don’t like is that the kits don’t come with glue, and you need that to put the first layer on the card. So I use glue sticks instead of glue from the bottle because it’s easier for me to hold a glue stick than a bottle of glue.

Image: A cream and gold card with ornaments topped with red bows. Near the bottom of the card is a tag that says "Merry Christmas".

Freehand cards

Some of the supplies that work well for my freehand card creations are ink stamps and gel pens. Decorative punches don't work well for me because of the force required to operate them. I have yet to experiment with stencils.

Other types of cards

Diamond paintings kits include: Plastic diamonds which are little rhinestone-type beads, pink wax that you use to pick up the diamonds, and an unfinished card.

Image: On a blue background with white-dot snow, is a reindeer bust with blue eyes. He's wearing a Santa hat with decorations on his antlers and a red and white striped scarf on his neck. His nose is red. Below him in large, red capital letters is "Merry Christmas" with an exclamation mark on the end. 

In my next post, I will be reviewing The Cricut. I use it for making cards, and it can aid in other crafting projects as well.

Image: A light pink card with dark foil cut-outs. The central image is a silhouette of a cat with bats above its head. The corners of the card are also the foil. At the top of the card is a foil crescent moon with the words "trick or treat" in thin, black capital letters.

Does anyone else know of any other types of card-making supplies or techniques I should try?

Thursday, September 24, 2020

Musings From a Spazzy Crafter

Is a craft still my own when I feel like I am an assistant? I struggle with this question often.

I am working on a friendship bracelet and someone is working with me on it because I have trouble tying knots. The person makes the knot and I pull it tight. Is that my creation?

Does it matter how much help is needed? Does it matter the type of
help that is needed? If I string beads for bracelets but need help finishing the bracelets, can I still claim them as mine?

How do I show appreciation for people that help me create?

These are some of the questions that go through my head.

Do you struggle with these questions while you're crafting?

Musing and making,

Spazzy Crafter

P.S. The next post will be about card making.

~*~
Jennifer's Thoughts:  Personally, I think it depends on a few factors. If you need significant help on a type of project and are doing it as a business, giving your helper a share in the profits might be the way to go. If you're making something just for a gift, perhaps thanking them is all you need. Always work out what is expected beforehand. 

Little things like having someone tie a knot doesn't invalidate your ownership of the creation. You could consider the amount of time it takes for someone to help you, or how much of the project you need assistance with to determine if what you're working on is a collaboration. That's the thing: Even if you both put in equal amounts of effort, you are collaborating with someone to make something gorgeous and are not an assistant. It doesn't mean you're less of an artist (the design was still your idea, and you're providing labor and materials). It just means what you give to the person helping you depends on their amount of labor.


Friday, July 31, 2020

Spazzy Crafter Introduces Herself

I have spastic cerebral palsy which affects the left side of my body. I love to craft, so finding ways to adapt or adjust how I make crafts has been an interesting experience.

I have become a serious crafter in the last decade.

Crafts I am able to do with adaptation or assistance:
  • Card making
  • Diamond Dotz (Diamond Paintings)
  • Plastic canvas
  • Friendship bracelets
  • Ceramic painting
  • Loom knitting
  • Stamped cross stitch
  • Needlepoint
  • Beadwork (earrings/necklaces/bracelets)
In upcoming posts, I will be discussing each of these crafts, how I adapt them, and other adjacent topics. I will also be discussing crafts that I am not able do along with those I would like to try.

Does anyone have any crafting recommendations?

Yours truly,

Spazzy crafter